|
| Home | Articles | Hands-On: The Elastic Chairs of Samuel Gragg |
 
|
|
|
|
On August 31, 1808, Boston chairmaker Samuel Gragg (1772-1855) patented a design for a remarkable piece of bentwood seating furniture he called an "elastic chair," his interpretation of the classically inspired Greek klismos chair that was popular at the time. The elasticity he referred to was attained by steam bending wood to follow the outline of the chair rather than combining short pieces of wood in the more traditional manner of joined mortise-and-tenon construction. This technique resulted in a slight flexibility similar to what one experiences with a Windsor chair. Gragg's bentwood approach was ideally suited to the flowing, serpentine lines of the klismos as rendered by English designers of the period, and the resultant chair was a brilliant triumph, arguably one of the most important and innovative chairs in the history of American furniture.
|
|
 |
 |
Upper right: The chair described in Gragg's patent (Fig. 1) has anthropomorphic "goat-hoof" front legs attached to a bentwood, or "elastic," back and seat. Subsequently, he developed a "fully-elastic" chair featuring bentwood sides that run in a continuous line from crest rail to foot. Fig 1: The completed chair is then decorated with a yellow ochre ground and peacock feather design. See the following article for details of this process.
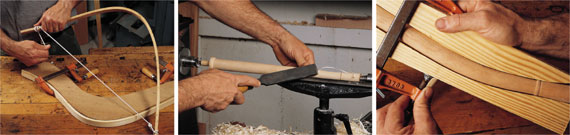
Above left: Hickory, ash, and white and red oak are most suited for steam bending. In the patent, Gragg refers to the use of "oak, ash or other appropriate woods," and indeed, hickory, oak, and ash all appear in his elastic chairs.
Step 1: One key to steam bending is to maximize the strength of the wood by orienting the grain so that the fibers run parallel with the surface. This is obtained not by sawing the wood, which inevitably results in some variation of grain alignment, but by splitting or "riving" wood in the traditional manner. A log is first quartered, then split into 8ths, 16ths, and so on, until a strip of the approximate required size is produced.
The split strips of wood are brought to finished dimension with a hand plane (see image). Strips intended for the back are thinnest where they cross the back of the seat, and side pieces thinner at the top where they join the crest rail.
Step 2: To attain the necessary elastic shapes, strips are steamed in a wood box that is fed with steam from boiling water. The rule of thumb is one hour of steaming per one inch thickness of wood, regardless of width.
|
|
 |
|
Left to right: Steps 3, 4A, and 4B.
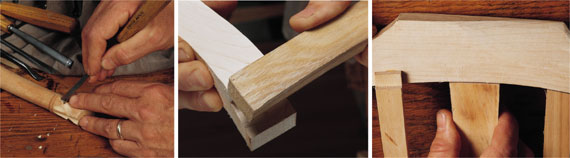
Step 3: Strips are removed from the steam box and quickly bent over a mold or jig. The mold is made to purposefully over-bend the strips so that the result, after spring-back, is the desired curve.
Steam bent wood needs to be held to shape until completely cool and dry. Rather than make a mold for each strip, the bent pieces are removed from the mold and held with twine while curing.
Step 4: The front and back legs are first turned to shape in the lathe (A). They are then steam bent to the desired curve and placed in a caul to retain shape while cooling (B). Final details are added to the hoof with carving chisels (C).
The top of each back leg is fashioned with a large, round, barely shouldered tenon and the top of each front leg is made with a smaller, deeply shouldered tenon that not only fixes the leg in place, but acts as a through-fastening for the front corners of the seat (see steps 7, 8).
|
|
 |
|
Left to right: Steps 4C, 5, and 6A.
Step 5: While the bent wood is cooling and drying, the seat and crest rails are sawn and then sculpted to their general shape with spokeshave, carving tools, rasp, and file.
The two seat rails and the crest rail are fitted together with simple ship- or half-lap joints (see image). All are temporarily screwed together to form the primary seat and back frame.
Step 6: The full-length strips are tenoned into the crest rail (A); notched through the back seat rail (B); and dovetailed into the front seat rail (C). The additional short intermediate seat strips are now also dovetailed into place (C).
|
|
 |
|
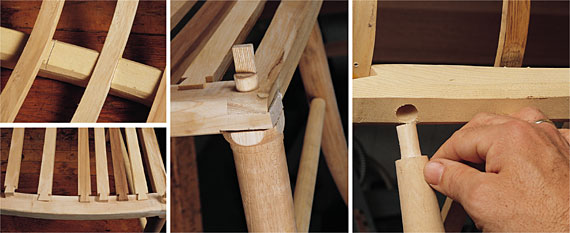
Clockwise from upper left: Steps 6B, 7, 8, and 6C.
Step 7: Once the elastic back and seat assembly is complete, the front legs are joined to the front corners of the seat. The temporary screws are removed, and a hole is bored through the joint to receive the shouldered tenon on the top of the leg. The tenon is then wedged from the top with a small piece of wood to lock everything in place.
Step 8: The remaining pieces (rear legs and stretchers) are installed in the same manner as in traditional "stick" or Windsor construction, with round tenons inserted into bored holes.
|
|
Mike Podmaniczky is Senior Furniture Conservator at Winterthur and curator of The Incredible Elastic Chairs of Samuel Gragg, the first-ever exhibition devoted to Gragg and his work. The exhibition, which originated at Winterthur Museum, is currently on view at the Milwaukee Art Museum until October 19. It opens at the Peabody Essex Museum in Salem, Mass. on November 11. Jim Schneck is a staff photographer at Winterthur.
|
|
|
|
|
Antiques and Fine Art is the leading site for antique collectors, designers, and enthusiasts of art and antiques. Featuring outstanding inventory for sale from top antiques & art dealers, educational articles on fine and decorative arts, and a calendar listing upcoming antiques shows and fairs.
|