|
| Home | Articles | Hands On: Seventeenth-Century Carving Techniques |
 |
|
|
|
by Peter Follansbee
|
Seventeenth-century oak furniture from both England and New England often features a variety of carved decoration. These elements are derived from a few basic formats incorporating a combination of floral work and architectural patterns. The only period writing pertaining to the methods of carving is in John Evelyn's Sylva (1664), in which he says "...even the greenest Timber is sometimes desirable for such as Carve and Turn..."1 Reproducing these works therefore begins with careful study of the surviving furniture and woodwork.
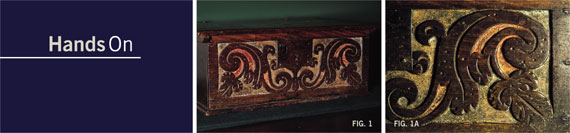
The "boarded" box in figures 1 and 1A was probably made in Devonshire, England, in the second half of the seventeenth century. It is all oak, carved and painted on the front, and nailed together at the corners. The carving on this box differs from much of the carving of the period in that it was executed freehand instead of laid out with a compass and ruler. The pattern consists of a pair of opposing stylized "S" curves, filled out with floral and geometric designs. This article looks at the process involved in reproducing the carving from this box.2
|
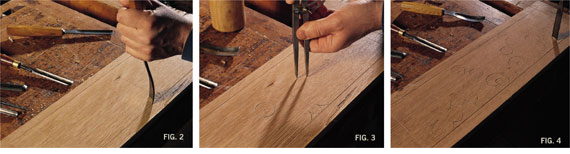 |
FIG. 2: Starting with an oak board about 7 x 19 x 1/2 inches thick, the joiner strikes the margins and centerline with a marking gauge, awl, and square. The actual layout of the pattern begins by "striking" marks with the use of curved gouges and a mallet. This step establishes the outline of the intended motif.
FIG. 3: The compass is an integral layout tool in most period carvings. In this particular pattern it only scribes a small circle that becomes a pinwheel in the design.
|
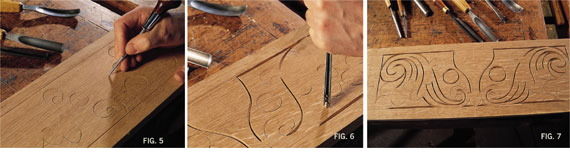 |
FIG. 4: Using the various gouges seen on the bench, each of a different size and "sweep" (curvature), the pattern emerges. This work is the foundation for the entire carving. A symmetrical design is the goal, but only in a general sense. Variation from left to right is usually found, resulting from working by "eye" instead of using a template.
FIG. 5: After the elements laid out with the gouge are lightly incised, the carver uses an awl to scribe a curved line connecting the sections of the "S" shape. This lightly scribed line serves as a general guide in cutting the outline.
FIG. 6: A carving gouge known as a "v-tool" is used to outline the scribed layout done with the awl. With this tool the carver cuts the outlines to the full depth in one pass, not as a series of lighter cuts working progressively deeper. Thus, there is one attempt at establishing the pattern. This is where variation in the symmetry becomes evident.
|
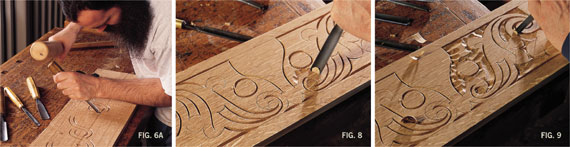 |
FIG 6A: This photo shows a different pattern, but illustrates clearly the use of the mallet to drive the gouge.
FIG. 7: The finished outlines, cut by striking the gouge, and incised lines cut with the v-tool. At this stage the panel is ready for the removal of background to give the carving its depth. Outlining this box front took about fifteen minutes.
FIG. 8: Using a curved gouge, about 1 inch wide in this instance, the background is removed. The initial surface is unimportant: the idea is to quickly cut away the background.
FIG. 9: Ultimately a slightly curved gouge pares away the rough surface of the background. The faceted surface still remains, though it will be evened off. There is no need to obsess about making the background flat since it will be decorated (see Fig. 13).
|
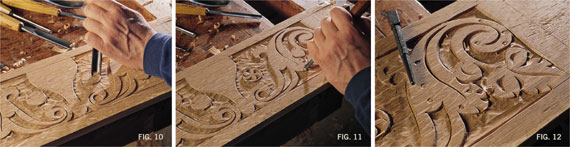 |
FIG. 10: Some of the minor details are the simplest of all and the most effective in creating a sense of depth by contrast of light and shadow. Part of the design is the round circles remaining near the center of the panel after removing the background. These are cut into "pinwheels" by chopping straight down into the circle with a gouge. The spacing and amount of curve used to make the pinwheel varies from one tradesman to another.
After chopping straight down, the same gouge is angled with its handle lowered and positioned behind the incised gouge cut. Tapping with the mallet and levering the tool's edge from side to side, a crescent-shaped chip pops out. This chip can be wide or narrow, depending on how close to the original cut one starts. It can be deeper or shallower, depending on the angle at which the tool is held: lowering the handle creates a shallower cut, with the handle higher, a deeper cut.
FIG. 11: Similar methods create smaller details in the foliage, and incised lines with the v-tool accent the "S" curves as well.
FIG. 12: A small round punch makes some of the simplest details of all--just rows of dots breaking up the surface of the foreground. I used a modern nail set in this example though simple punches can be made quite easily as well.
|
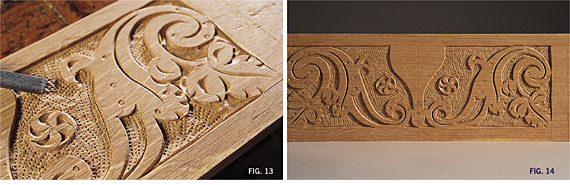 |
FIG. 13: Similarly, a textured background results from stippling with a punch made by filing rows of "teeth" into a blank of steel. Strong hammer blows are required to drive the punch deep enough into the oak. This type of textured background appears in many seventeenth-century carvings.
FIG. 14: The completed box front, cut in less than ninety minutes. The original was painted.
|
Photography by Jerel Dye, courtesy of Plimoth Plantation.
Peter Follansbee has studied traditional woodworking for over twenty years. He specializes in making reproductions in the seventeenth-century style, and since 1994 has been the joiner at Plimoth Plantation in Plymouth, Massachusetts. His articles have appeared in Old Time New England (SPNEA) and American Furniture (Chipstone Foundation).
|
|
- John Evelyn, Sylva, Or a Discourse of Forest-Trees, and the Propagation of Timber in His Majesty's Dominions, &c. (London, 1664). Edited by Guy de la Bedoyere (1995) and used with permission. Available: www.british-trees.com/bibliography/silv.htm.
- Personal communication with Victor Chinnery. For transmission of this style to Ipswich, Massachusetts, see Jonathan L. Fairbanks and Robert F. Trent, eds., New England Begins: The Seventeenth Century, 3 vols. (Boston: Museum of Fine Arts, 1982) 3: 514-519.
|
|
|
|
|
Antiques and Fine Art is the leading site for antique collectors, designers, and enthusiasts of art and antiques. Featuring outstanding inventory for sale from top antiques & art dealers, educational articles on fine and decorative arts, and a calendar listing upcoming antiques shows and fairs.
|